Volvo Maintenance FAQ for 7xx/9xx/90 Cars Top of Page
The following is a shortcut for installing the replacement vacuum valve involved with this problem. It is assumed that the old valve has proven faulty. Tom Irwin led me through my replacement and I feel the information can save much time and money. Tom Irwin did his on a 960 and I did mine on a 940 se. Basically it will include most 7 and 9 series that have that double acting valve. Believe this tends to be in the automatically controlled heating-ac cars. They all look alike from my studying the manuals.
Tools required
Picture #1 - Mark the area to be cut.
Note the box in the picture and chalk marks. These are on theleft
side of the box. 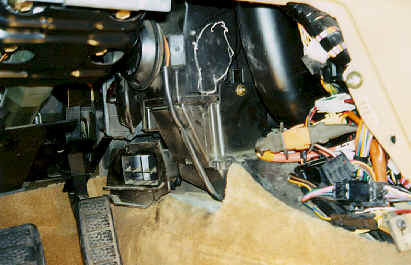 Drill
1/4-inch holes at the top left, top right, going diagonally up at approximately
45 degrees. Drill another hole, bottom left and another hole on the
right side of the box. Cut across side-to-side. Next, make
a vertical cut, and swing the plastic flap to the right side. Picture
2.
Drill
1/4-inch holes at the top left, top right, going diagonally up at approximately
45 degrees. Drill another hole, bottom left and another hole on the
right side of the box. Cut across side-to-side. Next, make
a vertical cut, and swing the plastic flap to the right side. Picture
2.  The plastic is quite
flexible and may crack, but should not break, thereby creating a hinge.
Take the hacksaw and cut to the left, horizontally, on both top and bottom,
and swing the plastic flap to the left.
The plastic is quite
flexible and may crack, but should not break, thereby creating a hinge.
Take the hacksaw and cut to the left, horizontally, on both top and bottom,
and swing the plastic flap to the left.
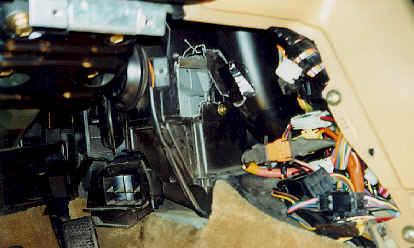
Picture #3 - You now have access to the
inside of the box. The vacuum valve is located on the left outside
of the box and has two hose connections. 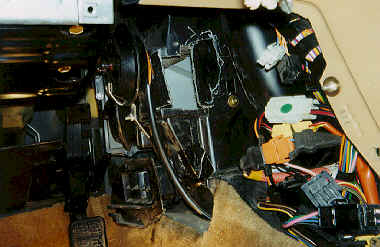 Remove
the hoses, and mark them for re-assembly. Next, using a 10-mm
deep socket, and the Sidewinder ratchet, remove the two mounting nuts.
Next, remove the press-on retainer from the air-diverter post which holds
the vacuum valve. Remove the vacuum valve.
Remove
the hoses, and mark them for re-assembly. Next, using a 10-mm
deep socket, and the Sidewinder ratchet, remove the two mounting nuts.
Next, remove the press-on retainer from the air-diverter post which holds
the vacuum valve. Remove the vacuum valve.
Pictures #4 and #5 - In this picture, you
can see the valve attachment to the air-diverter and the valves without
hoses. 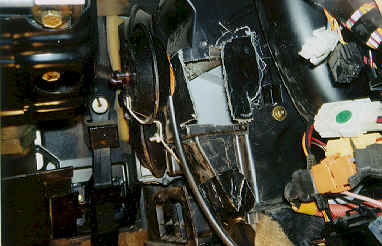 This is also a
picture of the new valve installed. Before installing the new valve,
install the nuts on the valve to cut threads into the plastic stud.
Now install the new valve, without the nuts. Attach the valve to
the air-diverter post and replace the lock piece. Next, replace the
nuts on the new vacuum valve. You may need to use some masking tape
inside of the socket to hold the nuts in place to prevent them from falling
out. Be careful putting these nuts back on as the plastic studs may
break.
This is also a
picture of the new valve installed. Before installing the new valve,
install the nuts on the valve to cut threads into the plastic stud.
Now install the new valve, without the nuts. Attach the valve to
the air-diverter post and replace the lock piece. Next, replace the
nuts on the new vacuum valve. You may need to use some masking tape
inside of the socket to hold the nuts in place to prevent them from falling
out. Be careful putting these nuts back on as the plastic studs may
break.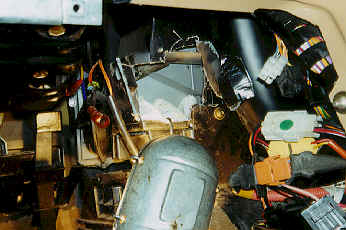
I am now going to assume that you have broken one or both plastic studs on the vacuum valve. You will need to fabricate a bracket, as noted in picture #4. Bracket material is the same material as used to mount car radios. This has multiple perforations and is fairly easily bent. Tom Irwin experienced breaking both studs and fabricated a bracket which held the valve on by going over the vacuum valve. The bracket had a hole in the center, which was enlarged, to go over the center hole of the vacuum valve. The bracket was attached to the air-box by using small screws. The bracket I used had a small bolt going through the box. Make certain that wherever you mount the screws that they cause no interference with the movement of the diverter in the air-box.
Attach vacuum hoses. Start the car,
and check that the valve works properly by moving your heating-air-conditioning
controls. If all is well, clean up the edges of the flaps which were
cut, bend them back into position, and use J-B Weld or a similar product
to hold in position. Next, use the black RTV-silicone sealant.
Do not use too much as it could interfere with inside air-flap movement!
After the sealant is dry, you may desire to put duct-tape over the entire
incision. You will note in Picture #6 the reassembled unit minus
the duct-tape. This has worked well for us during the past months.
Replace the bolster and any other parts
that were removed. Enjoy your air-conditioner.